Digispark
Sun Dec 19 2021 11:44:50 (Unix time = 1639935890)
I've started working with the Digispark ATTINY85 development board. Although the ATTINY85 is small, this makes it trickier to work with — some compromises were required for size. Even so, the Digispark is a cool little board but has its own quirks and benefits.
Things to Know
The Digispark is definitely different, so there are a few things that it can help to realize before you begin working with it. Here are a few I've encountered:
- When programming with the bootloader over USB, start programming the board, and then plug it in. You'll need to do this each time you want to program it.
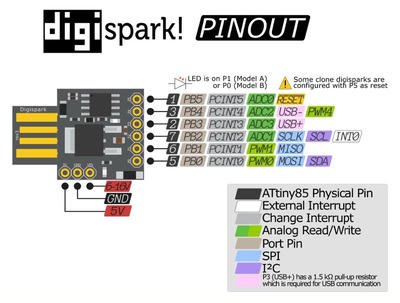
- The original Digispark used P5 for I/O and it could not be used as RESET. The numerous inexpensive Digispark clones (primarily Chinese) do not use P5 for I/O. It is still the RESET pin.
- P3 and P4 are overloaded for use via the USB emulation, and so programs that use P3 and P4 (for example, my Serial experiment) will cause some challenges with programming the board. You may need to disconnect P3 and P4 prior to programming, and if this is on a permanent circuit you probably will want a disconnect.
- You can use P5 as a RESET if it is not used for I/O. I've found that just grounding it will work to start programming, which means you don't have to plug/unplug the board. This doesn't work if you're using P3 and P4 as noted above.
Digispark Documentation
More Articles
- Getting Started with Micronucleus - 2021-12-19
- Digispark: Getting Started - Blink - 2021-12-18
- Digispark: Button - 2021-12-19
- Digispark ATTINY85 Software Serial RX/TX - 2021-12-24
- Digispark + Arduino Setup on Fedora 35 - 2021-12-16